Running WordPress on Kubernetes
This page was converted from my old blog and hasn't been reviewed. If you see an error please let me know in the comments.
WordPress on Kubernetes
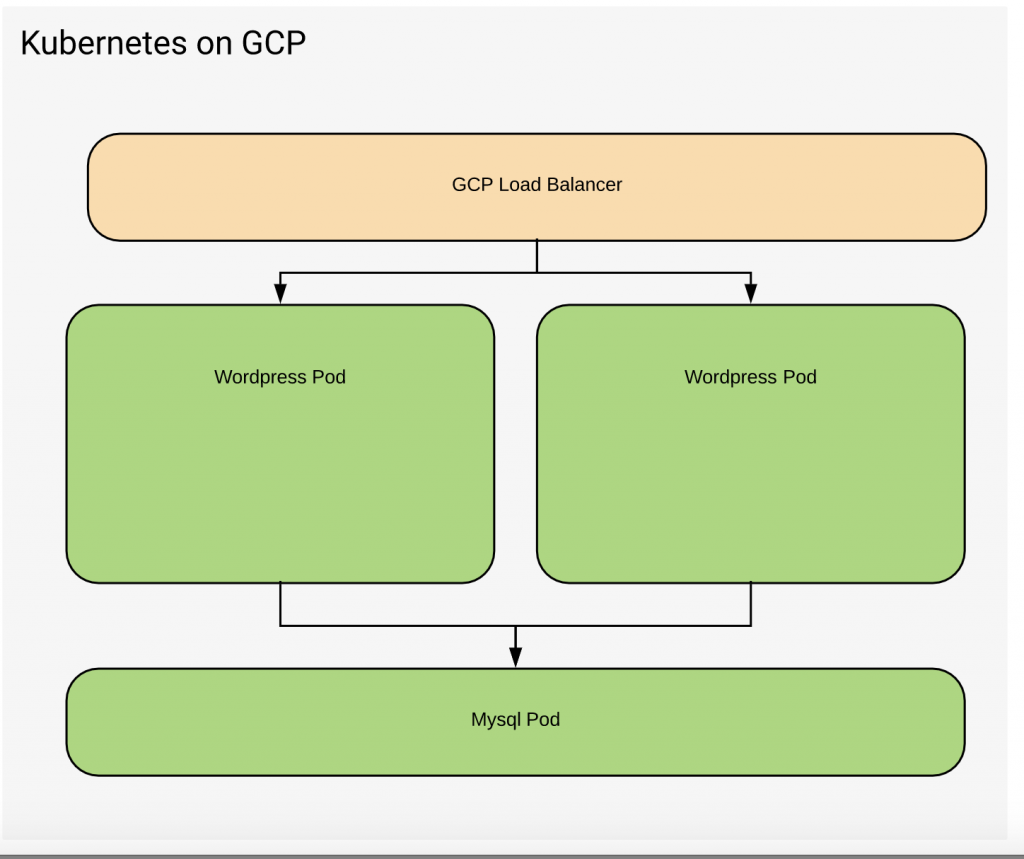
Recently I posted about creating a highly available WordPress deployment using Amazon Web Services. The focus was using Terraform and Docker to automate the deployment. With the release of Pivotal Container Service I thought I would explore what it would take to get a similar setup running on GCP. This post will focus more on using Kubernetes to deploy your containers.
Before you start make sure that you have a Kubernetes cluster setup in GCP.
Create the Kubernetes cluster
gcloud container clusters create kub-1
Update kubectl to point to the new cluster. The below command will load the required credentials for you to interact with the cluster.
gcloud container clusters get-credentials kub-1
Once the cluster is ready we can begin by setting up WordPress.
Create the Database
The first step is creating the database. The simplest thing to do in this case is to create one inside our Kubernetes cluster. There are some flaws with this approach which I will discuss later.
apiVersion: v1
kind: Pod
metadata:
  name: mysql
  labels:
    app: wordpress
    tier: mysql
spec:
  containers:
    - image: mysql
      name: mysql
      env:
       - name: "MYSQL_ROOT_PASSWORD"
         value: "somewordpress"
       - name: "MYSQL_DATABASE"
         value: "wordpress"
       - name: "MYSQL_USER"
         value: "wordpress"
       - name: "MYSQL_PASSWORD"
         value: "wordpress!"
      ports:
        - containerPort: 3306
          name: db
          protocol: TCP
The above YAML configuration defines a Pod based on the Mysql docker image. The Pod is the lowest level object within Kubernetes. A pod can be responsible For running 1 or more containers. It may be tempting to run more than one Docker container within a pod but generally, this is considered an anti-pattern. If you have two containers within a pod you cannot scale them independently. We could have defined our WordPress instance here but that will reduce our flexibility if we decide we need to scale the front end PHP app.
In addition to defining the container image to be used we must specify some of the environment variables that are required to configure the instance.
Apply the configuration to create the database.
kubectl apply -f mysql.yaml
Now that we have a Mysql instance we need to expose it as a service that WordPress can consume. It is always best to communicate between pods using a service. The service acts as a decoupling point between the pods. We can change the implementation of a backend service without informing the consumer. In addition, we can scale the pod to multiple instances if more capacity is required.
apiVersion: v1
kind: Service
metadata:
  name: wordpress-mysql
  labels:
    app: wordpress
spec:
  ports:
    - port: 3306
  selector:
    app: wordpress
    tier: mysql
The above YAML exposes the new service. Kubernetes uses labels to connect the service to the eligible pods that support it. In this case, we are targeting our service at any pod with the labels . app=wordpress and tier=mysql If we scale the MySQL pod with additional instances the service will round-robin requests between them.
Jeffreys-MacBook-Pro:kuar jeff$ kubectl apply -f service.yaml

Jeffreys-MacBook-Pro:kuar jeff$ kubectl get services
NAME              TYPE           CLUSTER-IP     EXTERNAL-IP     PORT(S)          AGE
kubernetes        ClusterIP      10.15.240.1    <none>          443/TCP          31m
wordpress-mysql   ClusterIP      10.15.248.13   <none>          3306/TCP         11s
As we can see we now have the wordpress-mysql service listening on 10.15.248.13:3306
Starting WordPress
Now that we have Mysql up and running we can deploy WordPress itself.
apiVersion: v1
kind: Pod
metadata:
  name: wordpress
  labels:
    app: wordpress
    tier: frontend
spec:
  containers:
    - image: wordpress
      name: wordpress
      env:
       - name: "WORDPRESS_DB_HOST"
         value: "10.15.248.13:3306"
       - name: "WORDPRESS_DB_USER"
         value: "wordpress"
       - name: "WORDPRESS_DB_PASSWORD"
         value: "wordpress!"
      ports:
        - containerPort: 80
          name: web
          protocol: TCP
The pod definition utilizes the WordPress Docker container. We have hardcoded the database address using the IP of the MySQL container. Later on, I will discuss how to expose this address using Kubernetes service discovery.
Lastly, we need to expose WordPress via a load balancer facing the internet.
Jeffreys-MacBook-Pro:kuar jeff$ kubectl expose pod wordpress --port=8888 --target-port=80 --name=wordpress --type=LoadBalancer

Jeffreys-MacBook-Pro:kuar jeff$ kubectl get services
NAME              TYPE           CLUSTER-IP     EXTERNAL-IP     PORT(S)          AGE
kubernetes        ClusterIP      10.15.240.1    <none>          443/TCP          54m
wordpress         LoadBalancer   10.15.254.22   35.226.13.13    8888:31817/TCP   6m
wordpress-mysql   ClusterIP      10.15.248.13   <none>          3306/TCP         23m
Once the load balancer is created we can access the blog at http://35.226.13.13:8888/
While we now have things running there are several things we can improve on.
Exposing the database using service discovery.
When creating a service Kubernetes creates DNSns entry to help locate that service. The format is my-svc.my-namespace.svc.cluster.localWith this in mind we can update the app’s database connection. If we move the database or change its implementation as long as the service name is the same our application will be able to connect.
apiVersion: v1
kind: Pod
...
  containers:
    - image: wordpress
      name: wordpress
      env:
       - name: "WORDPRESS_DB_HOST"
         value: "wordpress-mysql.default.svc.cluster.local:3306"
       - name: "WORDPRESS_DB_USER"
         value: "wordpress"
       - name: "WORDPRESS_DB_PASSWORD"
         value: "wordpress!"
While all of this works as desired it exposes a few anti patterns in Kubernetes.
Use a Deployment
As mentioned earlier pods are the lowest level of deployment within Kubernetes. A Deployment is a higher level artifact in Kubernetes. It’s a description of a desired state and is also the starting point of being able to upgrade your application in a controlled manner.
To illustrate this more simply I will use a Deployment containing an Nginx container.
apiVersion: apps/v1
kind: Deployment
metadata:
  name: nginx-deployment
  labels:
    app: nginx
spec:
  replicas: 3
  selector:
    matchLabels:
      app: nginx
  template:
    metadata:
      labels:
        app: nginx
    spec:
      containers:
      - name: nginx
        image: nginx:1.7.9
        ports:
        - containerPort: 80
The Yaml above will create or desired state of having 3 copies of the nginx Pod running. It will create a ReplicaSet which is repsoible if ensuring we always have 3 nodes running.
Jeffreys-MacBook-Pro:kuar jeff$ kubectl apply -f nginx-deployment.yaml
deployment "nginx-deployment" created
Jeffreys-MacBook-Pro:kuar jeff$ kubectl get pods
NAME                                READY     STATUS    RESTARTS   AGE
nginx-deployment-569477d6d8-8v8qw   1/1       Running   0          13s
nginx-deployment-569477d6d8-fz25k   1/1       Running   0          13s
nginx-deployment-569477d6d8-rck2v   1/1       Running   0          13s

Jeffreys-MacBook-Pro:kuar jeff$ kubectl get rs -o wide
NAME                          DESIRED   CURRENT   READY     AGE       CONTAINERS   IMAGES        SELECTOR
nginx-deployment-569477d6d8   3         3         3         3m        nginx        nginx:1.7.9   app=nginx,pod-template-hash=1250338284
Applying the deployment gives us three copies of the pod. If one pod is terminated it will be replaced automatically by the ReplicaSet.
Jeffreys-MacBook-Pro:kuar jeff$ kubectl delete pod nginx-deployment-569477d6d8-8v8qw
pod "nginx-deployment-569477d6d8-8v8qw" deleted
Jeffreys-MacBook-Pro:kuar jeff$ kubectl get pods
NAME                                READY     STATUS        RESTARTS   AGE
nginx-deployment-569477d6d8-8v8qw   0/1       Terminating   0          1m
nginx-deployment-569477d6d8-fz25k   1/1       Running       0          1m
nginx-deployment-569477d6d8-rck2v   1/1       Running       0          1m
nginx-deployment-569477d6d8-xdhtn   1/1       Running       0          5s
Rollouts
If we wish to update nginx we can force a rolling deployment of the upgrade. After editing the Yaml with the new version we can force an update. Deployments have options that can be configured to control what process is used for the rollout. In most cases you will want a rolling update to prevent an outage.
Jeffreys-MacBook-Pro:kuar jeff$ kubectl apply -f nginx-deployment.yaml  --record
deployment "nginx-deployment" configured
Jeffreys-MacBook-Pro:kuar jeff$ kubectl rollout history deployment nginx-deployment
deployments "nginx-deployment"
REVISION  CHANGE-CAUSE
3         <none>
4         kubectl apply --filename=nginx-deployment.yaml --record=true
Deployments also keep a history of the changes as it is possible to rollback a deployment to a previous Version.
Jeffreys-MacBook-Pro:kuar jeff$ kubectl get deployments -o wide
NAME               DESIRED   CURRENT   UP-TO-DATE   AVAILABLE   AGE       CONTAINERS   IMAGES        SELECTOR
nginx-deployment   3         3         3            3           17m       nginx        nginx:1.9.0   app=nginx
Jeffreys-MacBook-Pro:kuar jeff$ kubectl rollout undo deployments nginx-deployment
deployment "nginx-deployment"
Jeffreys-MacBook-Pro:kuar jeff$ kubectl get deployments -o wide
NAME               DESIRED   CURRENT   UP-TO-DATE   AVAILABLE   AGE       CONTAINERS   IMAGES        SELECTOR
nginx-deployment   3         4         3            3           17m       nginx        nginx:1.7.9   app=nginx
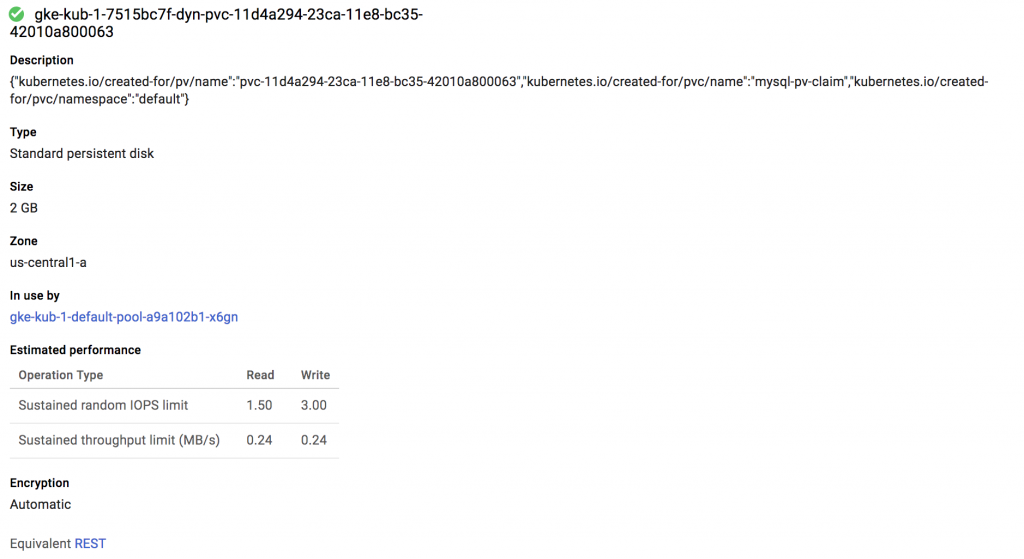
Persistent Disk Storage
Back to WordPress: So far we have a created a Mysql database deployed to our cluster. With this setup is that we have a our data stored inside the container. If we need to recreate this container for any reason we will lose our date. Therefore we want to store data outside of the container. Kubernetes provides a volume service to do this. Depending on the cloud provider used there may be a few options of what type of disk to use. Since we are in GCP Kubernetes will use a GCEPersistentDiskby default.
---
apiVersion: v1
kind: PersistentVolumeClaim
metadata:
  name: mysql-pv-claim
  labels:
    app: wordpress
spec:
  accessModes:
    - ReadWriteOnce
  resources:
    requests:
      storage: 2Gi
---
apiVersion: apps/v1beta2 # for versions before 1.9.0 use apps/v1beta2
kind: Deployment
metadata:
  name: wordpress-mysql
  labels:
    app: wordpress
spec:
  selector:
    matchLabels:
      app: wordpress
      tier: mysql
  strategy:
    type: Recreate
  template:
    metadata:
      labels:
        app: wordpress
        tier: mysql
    spec:
      containers:
      - image: mysql:5.6
        name: mysql
        env:
        - name: MYSQL_ROOT_PASSWORD
          value: "helloworld!"
        ports:
        - containerPort: 3306
          name: mysql
        volumeMounts:
        - name: mysql-persistent-storage
          mountPath: /var/lib/mysql
      volumes:
      - name: mysql-persistent-storage
        persistentVolumeClaim:
          claimName: mysql-pv-claim
---
In the above Yaml we assign /var/lib/mysql to a persistent volume.
Jeffreys-MacBook-Pro:kuar jeff$ kubectl apply -f mysql.yaml
persistentvolumeclaim "mysql-pv-claim" created
deployment "wordpress-mysql" created
Jeffreys-MacBook-Pro:kuar jeff$ kubectl get pv
NAME                                       CAPACITY   ACCESS MODES   RECLAIM POLICY   STATUS    CLAIM                    STORAGECLASS   REASON    AGE
pvc-11d4a294-23ca-11e8-bc35-42010a800063   2Gi        RWO            Delete           Bound     default/mysql-pv-claim   standard                 1s
This volume is created automatically for us when the Deployment is applied.
Putting it all together
Its possible to combine the entire configuration with a single yaml file. Similar to what you would do with docker-compose.
apiVersion: v1
kind: Service
metadata:
  name: wordpress-mysql
  labels:
    app: wordpress
spec:
  ports:
    - port: 3306
  selector:
    app: wordpress
    tier: mysql
  clusterIP: None
---
apiVersion: v1
kind: PersistentVolumeClaim
metadata:
  name: mysql-pv-claim
  labels:
    app: wordpress
spec:
  accessModes:
    - ReadWriteOnce
  resources:
    requests:
      storage: 2Gi
---
apiVersion: apps/v1beta2 # for versions before 1.9.0 use apps/v1beta2
kind: Deployment
metadata:
  name: wordpress-mysql
  labels:
    app: wordpress
spec:
  selector:
    matchLabels:
      app: wordpress
      tier: mysql
  strategy:
    type: Recreate
  template:
    metadata:
      labels:
        app: wordpress
        tier: mysql
    spec:
      containers:
      - image: mysql:5.6
        name: mysql
        env:
        - name: MYSQL_ROOT_PASSWORD
          value: "helloworld!"
        ports:
        - containerPort: 3306
          name: mysql
        volumeMounts:
        - name: mysql-persistent-storage
          mountPath: /var/lib/mysql
      volumes:
      - name: mysql-persistent-storage
        persistentVolumeClaim:
          claimName: mysql-pv-claim
---
apiVersion: v1
kind: PersistentVolumeClaim
metadata:
  name: wp-pv-claim
  labels:
    app: wordpress
spec:
  accessModes:
    - ReadWriteOnce
  resources:
    requests:
      storage: 2Gi
---
apiVersion: apps/v1beta2 # for versions before 1.9.0 use apps/v1beta2
kind: Deployment
metadata:
  name: wordpress
  labels:
    app: wordpress
spec:
  selector:
    matchLabels:
      app: wordpress
      tier: frontend
  strategy:
    type: Recreate
  template:
    metadata:
      labels:
        app: wordpress
        tier: frontend
    spec:
      containers:
      - image: wordpress:4.8-apache
        name: wordpress
        env:
        - name: WORDPRESS_DB_HOST
          value: wordpress-mysql
        - name: WORDPRESS_DB_PASSWORD
          value: "helloworld!"
        ports:
        - containerPort: 80
          name: wordpress
        volumeMounts:
        - name: wordpress-persistent-storage
          mountPath: /var/www/html
      volumes:
      - name: wordpress-persistent-storage
        persistentVolumeClaim:
          claimName: wp-pv-claim
Other areas to explore
There are a few other areas that I will be exploring futher
- Using a cloud sql database to provide high availability
- Using Kubernetes secrets management
- Using Kubernetes autoscaling