Building a scalable web site using AWS/Docker/Terraform: adding redundancy
In my last post I showed how to use Terraform to create an EC2 instance as well as a RDS to host WordPress. One problem with this setup is that we only have one host inside a single availability zone. The RDS already uses a multi AZ deployment so if the availability zone fails we will lose access to our website. To solve this we can use an Autoscaling Group to ensure that we have at least 2 instances running in separate availability zones.
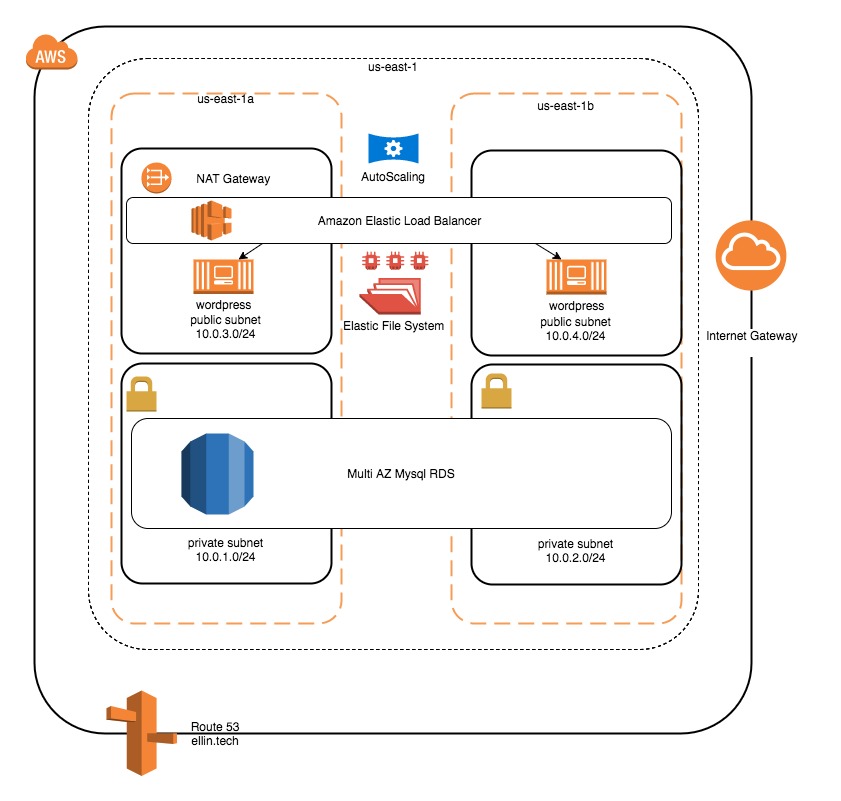
We will accomplish this by adding an AutoScaling Group and an Elastic File System. The autoscaling group will be responsible for maintaining the correct number of instances and the Elastic File System will be used for content that must be shared across instances.
Elastic File System (EFS)
First we will create an EFS since its highly available within a region and can be used to store media such as images, css, and javascript that is shared by multiple instances of WordPress.
resource "aws_efs_file_system" "wordpressfs" {
  creation_token = "wordpress-fs"


  tags {
    Name = "Wordpress FS"
    Project = "wordpress"
  }
}

resource "aws_efs_mount_target" "wordpress-a" {
  file_system_id = "${aws_efs_file_system.wordpressfs.id}"
  subnet_id      = "${aws_subnet.public-a.id}"
  security_groups = ["${aws_security_group.efs.id}"]
}


resource "aws_efs_mount_target" "wordpress-b" {
  file_system_id = "${aws_efs_file_system.wordpressfs.id}"
  subnet_id      = "${aws_subnet.public-b.id}"
  security_groups = ["${aws_security_group.efs.id}"]
}

output "efs-id" {
    value = "${aws_efs_file_system.wordpressfs.id }"
}
After creating the EFS we must also create a mount point within each availability zone that we wish to access it from.
We also must add a security group that the EFS will use to control access via port 2049.
resource "aws_security_group" "efs" {
    name = "efs-traffic"
    description = "Allow inbound traffic"
    vpc_id = "${aws_vpc.ellin-web.id}"

    tags {
        Name = "db-traffic"
        Project = "wordpress"
    }

    ingress {
        from_port = 2049
        to_port = 2049
        protocol = "tcp"
        cidr_blocks = ["0.0.0.0/0"]
    }

    egress {
        from_port = 0
        to_port = 0
        protocol = "-1"
        cidr_blocks = ["0.0.0.0/0"]
    }

}
EC2
Remove the resource “aws_instance” “docker” . It is no longer required since we will be launching the instance via scaling. In addition we need to make some changes to the bootstrap script to allow EFS to be connected on startup. We also need to tell docker to use the new mount point for the content directory.
#!/bin/bash -xe
whoami
apt-get -y update
apt-get -y install unattended-upgrades
apt-get -y install nfs-common
mkdir /efs
sudo mount -t nfs4 -o nfsvers=4.1,rsize=1048576,wsize=1048576,hard,timeo=600,retrans=2 ${efsid}.efs.us-east-1.amazonaws.com:/ /efs
curl 'https://bootstrap.pypa.io/get-pip.py' -o 'get-pip.py'
python get-pip.py
pip install awscli
apt-key adv --keyserver hkp://p80.pool.sks-keyservers.net:80 --recv-keys 58118E89F3A912897C070ADBF76221572C52609D
echo 'deb https://apt.dockerproject.org/repo ubuntu-trusty main' > /etc/apt/sources.list.d/docker.list
apt-get -y update
apt-get -y install docker-engine
apt-get -y install fail2ban
pip install docker-compose
docker run -d -e WORDPRESS_DB_HOST=${dbhost}:3306 -e WORDPRESS_DB_PASSWORD=wpdbwpdb -e WORDPRESS_DB_USER=wpdb -e WORDPRESS_DB_NAME=wpdb  -v /efs/wordpress:/var/www/html -p 80:80 wordpress:latest
In addition a small change is required to our template definition to pass in the id of the EFS.
data "template_file" "bootstrap" {
    template = "${file("bootstrap.tpl")}"
      vars {
        dbhost = "${aws_db_instance.wpdb.address}"
        efsid = "${aws_efs_file_system.wordpressfs.id}"
  }
}
Elastic Load Balancer (ELB)
An ELB will route traffic in a round robin fashion to any web server that is available. It also performs a health check so that traffic is not routed to unhealthy nodes.
# Create a new load balancer
resource "aws_elb" "wordpress" {
  name               = "wordpress"
  subnets = ["${aws_subnet.public-a.id}", "${aws_subnet.public-b.id}"]
  security_groups = ["${aws_security_group.web.id}"]

  listener {
    instance_port     = 80
    instance_protocol = "http"
    lb_port           = 80
    lb_protocol       = "http"
  }

  health_check {
    healthy_threshold   = 2
    unhealthy_threshold = 2
    timeout             = 3
    target              = "HTTP:80/"
    interval            = 30
  }

  cross_zone_load_balancing   = true
  idle_timeout                = 400
  connection_draining         = true
  connection_draining_timeout = 400

  tags {
    Name = "wordpress-elb"
    Project = "wordpress"
  }
}
Route 53
At this point we can also update our zone records to point to the ELB rather than a particular instance. The DNS record for the ELB never changes so unlike in the last post we don’t have to worry about restarting the instances. The Autoscaling group will register the instances with the ELB. A DNS CNAME is used to point elllin.tech to the DNS entry for the load balancer.
resource "aws_route53_record" "www_cc" {
   zone_id = "${aws_route53_zone.ellintech.zone_id}"
   name = "www.ellin.tech"
   type = "CNAME"
   ttl = "300"
   records = ["${aws_elb.wordpress.dns_name}"]
}

resource "aws_route53_record" "apex" {
  zone_id = "${aws_route53_zone.ellintech.zone_id}"
  name    = "ellin.tech"
  type    = "A"

 alias {
    name                   = "${aws_elb.wordpress.dns_name}"
    zone_id                = "${aws_elb.wordpress.zone_id}"
    evaluate_target_health = "false"
  }
}
Auto Scaling Group (ASG)
Lastly we define an ASG. The ASG will ensure that we always have the desired number of instances. If an instance goes offline the instance will be automatically replaced. In addition the ASG will launch the instances in a balanced way across availability zones.
resource "aws_launch_configuration" "wp_launch" {
  name_prefix          = "web_config"
  image_id      = "${data.aws_ami.ubuntu_ami.id}"
  instance_type = "t2.micro"
  associate_public_ip_address = true
  key_name = "ellin-aws-us-east-1"
  security_groups=["${aws_security_group.web.id}"]
   user_data = "${data.template_file.bootstrap.rendered}"
}

resource "aws_autoscaling_group" "wp_group" {
  name                 = "wordpress-asg"
  launch_configuration = "${aws_launch_configuration.wp_launch.name}"
  min_size             = 2
  max_size             = 2
  vpc_zone_identifier = ["${aws_subnet.public-a.id}","${aws_subnet.public-b.id}"]
  load_balancers = ["${aws_elb.wordpress.id}"]
  lifecycle {
    create_before_destroy = true
  }
}
It is within the launch configuration of the ASG that we define the ec2 settings such as AMI, instance type and security groups.
After applying this configuration with Terraform you should be able to visit www.ellin.tech and view the WordPress welcome screen. If you terminate one of the EC2 instances it should automatically replace it. The load balancer will assure that you always route traffic to an available instance.
While this creates a great deal of resiliency it does not yet address the issue of elasticity. We need to be able to respond to additional demands when a popular new post is made to the WordPress site. I will cover how to do that in the next post.
Continued in: Building a scalable web site using AWS/Docker/Terraform: adding elasticity
Posts in this Series
- Building a scalable web site using AWS/Docker/Terraform: adding elasticity
- Building a scalable web site using AWS/Docker/Terraform: adding redundancy
- Building a scalable web site using AWS/Docker/Terraform: odds and ends
- Building a scalable web site using AWS/Docker/Terraform: adding RDS and WordPress
- Building a scalable web site using AWS/Docker/Terraform